
Attaching a Wire Handle to Your Basket
Attaching Wire Handles to Your Basket (for printing)
Wire Handles from Basket Maker's Supply
Attaching a Wire Handle to Your Basket

Attaching a wire handle to your basket is easy.
Finish your basket including fitting the rims and scarfing the overlaps. Add a rim filler if desired. Use clothespins to hold the rims in place.
The ends of the wire handle will be formed into loops. The inside rim will slide into the loops of the handle and this will secure the handle to your basket.
First cut a 4" to 6" scrap from your inside rim material.
In the photos below the inside rim is 1/2" flat oval. We will call the round side the 'front' and the flat side the 'back'.

Photo 1 - Front of inside rim.

Photo 2 - Back of inside rim.
Measure the length needed to form the loop around your rim. I used a scrap piece of cane. See Photos 1 and 2.

Photo 3 - Front of inside rim.

Photo 4
Mark the length on the cane. Use a piece of masking tape and transfer the mark to the end of the wire handle. The mark lines up with the bottom of the masking tape. See Photos 3 and 4.

Photo 5 - Front of inside rim.

Photo 6
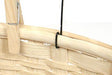
Align the bottom of the masking tape with the top of the scrap rim. Using your hands or pliers bend the end upwards over the front of the rim. Remove the scrap piece of rim and bend the end with pliers to form a loop. See Photos 5 and 6.

Photo 7- Back of inside rim.
Slide the scrap piece into the loop and with your pliers squeeze the end of the handle so the end lays flat against the back of the rim (not too tightly). See Photo 7.
Slide the scrap rim out of the loop. Repeat this process for the other end of your handle.
Remove the inside rim from your basket, slide the inside rim into the loops and position the rim and handle in your basket. See Photo 8. If the loop is a little tight, open the loop with a packing tool or pencil.
With the inside and outside rims in place, the rim filler between the rims, and the handle in position, the rims are now ready to be lashed.

Photo 8
Copyright 2012 - GH Productions Inc.
Basket Maker's Supply
Attaching a Wire Handle to Your Basket
